Pond and Polytunnel

Over the wintertime I had noticed that the level of water in the pond had dropped slightly.

At the time I was a little concerned about there being a hole in the liner as the local kids had been on the plot and had used bricks and even the ceramic frog statue to break through the thick ice.

As the weather improved slightly my fears were justified as I came on site one morning to discover that there was very little water left in the pond at all.


Hole in the pond liner, each arm being just over an inch long

I took the opportunity to clear out a lot of muck and fallen leaves from the bottom of the pond, and whilst doing so I discovered a huge hole in the bottom of the liner.

There had been a spare square wooden baton left next to the pond, and when I placed it next to the hole the edges lined up almost perfectly.

It appears that when breaking the ice with the stick the local kids had pushed straight through the liner.

Whilst clearing out the pond I discovered three frogs which had been hibernating in the muck underneath the old slate which allowed them to climb in and out of the pond.

Now that I had found the frogs it became important for me to fix the hole as soon as I could to help them survive if the water froze again.

I got advice from my local aquarium shop and took several pieces of plastic and some waterproof adhesive and fixed the hole.  I then added about 200 litres of water which nearly half filled the pond.

Some time ago I had decided to get a cheap polytunnel which I hoped would last at least one season and give me some idea of whether a poly tunnel was good enough, or if I would need to invest in a greenhouse instead.

I looked on Ebay and managed to win a 8' x 6' poly tunnel for £42.  This was easy to erect and was soon up and in place.


Start of the decked area


My original plan for the area between the poly tunnel and the pond was to lay flagstones to make a patio area, but after seeing the amount of flooding that this area was prone to I changed my mind and started to build a slightly raised wooden deck.


Weed fabric over the rotivated area


The ground where the deck, poly tunnel and eventually a shed would be put was very uneven and had a thick layer of silt which was causing any rain to stay on the surface, so before I could start to install anything I had to get out the rotivator again and try to level the ground, covering it all over with a layer of weed fabric.


Essential Equipment

I had also been very lucky on Freecycle and got a garden table and four chairs - essential allotment equipment!

Victoria Rhubarb


The rhubarb bed was now nearly ready to be planted up so I brought my Victoria rhubarb from home so it could be transplanted as soon as the bed was properly weeded.


Potato Update

It has been absolutely ages since I got a chance to update my blog, for which I apologise.

Things have not stood still either at home or at the plot, so I wanted to share the progress of the potatoes with you.


Anya Sprouting in a bucket


If you remember, I started off two varieties, Anya and Maris Piper, both in buckets and also straight into the ground.


The first to show were the Anya in the bucket, just a couple out of the five tubers in each of three buckets.


More Anya - in the ground this time


A matter of days behind were the Anya planted straight into the ground in bed 7 which started to show, but slightly more vigorously.


And in buckets

Maris Piper in the ground


The Maris Piper were about five days behind, but had soon caught up both on the ground and in the buckets.


When the rest of the seed potatoes had got chits large enough for them to be planted out I took them down to the plot and placed them inside my poly tunnel.


Pentland Javelin in front, Bambino behind


Casablanca on the left, Salad Blue to the right


I planted out one row of each into the raised bed where the Anya and Maris Piper are growing, and I also planted up two buckets of each to set out on the plot with the other buckets.

I also planted a potato bag each of Casablanca and Pentland Javelin inside the polytunnel to see if there is any difference in growth rates between those outside and inside.


More Video Updates from March 2013

I can't believe how long it has been since I updated this blog.

I started with the best intentions to update at least once a week, but with the arrival of my first grandson at the start of March my limited free time has been squeezed even more than before.

I have been taking videos each week, however, and I have added a couple which I took in March below.


First Potatoes in the ground

After waiting so long for the weather to start getting warmer I decided to start planting out the first seed potatoes of 2013.

I have got plenty of potatoes chitting, most of which I had bought at a Potato Day back in Feb.

http://vegpatchkid.blogspot.co.uk/2013/02/potato-day.html

These have been set out in egg boxes for some time now, but there are really only two varieties which are ready to be planted out, the Anya and the Maris Piper.

The plan was to try to grow these in two different ways.  Last year I tried to grow potatoes at home in potato bags, but their yield was disappointing to say the least. 

I also put some supermarket potatoes in the ground at the plot - the very first thing I ever grew there - but as they didn't go into the ground until late July, whuch was far too late, they never really had much of a chance to grow and develop before they got struck down by blight.

This year I want to experiment a little, growing potatoes both in a raised bed and also in buckets and/or potato bags to see which method is a) easiest, and b) provides the best harvest.

I had been given a gardening voucher last year, so I decided to get out to the local garden centre and get it spent.

I picked up a load of 20 litre buckets which had large drainage holes in the bottom to use for planting potatoes.

Anya and Maris Piper ready for planting
Even though it is probably a little early, I decided to get the seed potatoes which are fully chitted into the ground as I am starting to get a little frustrated with the weather right now.

I filled the bottom of six buckets with about six inches of compost, and laid the seed potatoes on top.  I put three Maris Piper into half of the buckets, and five Anya into the rest.

These were covered by another six inches of compost, and the tubs were set out inside one of my raised beds which only has a covering of manure at the moment.

The plan is to earth up the growing plants as and when necessary until the buckets are pretty much full, then let the plants grow on until the harvest is ready when I will empty the buckets into the bed to harvest the potatoes.

This has two advantages - the harvest will be contained within the bed, and the compost will also fill the bed for me, killing two birds with one stone.

\The remaining seed potatoes were planted into another bed which had been newly double-dug over and well manured.

I put in two rows of Maris Piper and two of Anya.

It will be interesting to see how both methods compare.

Early March on the Allotment - Video Update

At last it looks like the drainage problems I have been experiencing on the top of my allotment may have been solved.

The drainage channel that was dug in back in January has been successful in letting the surplus water in the centre clear away, so I have been able to get the first of the soft fruit beds put in.

As these beds are a lot narrower than the beds that I have already put in because otherwise I would have six inches of wood and only 18 inches of soil in between.

The site has recently had a delivery of old scaffolding boards which were perfect for what I wanted, and were very cheap at only 20p per foot, so the cost for both beds was only £15.


I still need to do something about the very top of my ground, next to the path, as when it rains any surplus water from the wildlife area above my plot comes over the path and straight onto my plot where the ground level is lower.  I can either raise my ground or dig a diverting trench along the path - not sure what will be best.

There are still a few over wintering veg on the plot, but with the weather we have had recently they will be OK in the ground for a few more weeks.

I hope that the weather starts to look and feel like spring soon - I have loads of seeds waiting to be sown, but there is no point right now.

Early February on the Allotment

It looks as though the drainage problems I have been having may be well on the way to being sorted out.

We had a digger on site at the end of January and the trench I had started was deepened and enlarged, and so far it looks as though it might work.

I made a quick video to show progress.

Potato Day

On Sunday I attended my first ever potato day.

A potato day is where you can purchase a wide range of seed potatoes (and other plants).  The main difference to purchasing here rather than at a garden centre or from an online supplier is that you have the option of purchasing as few or as many of each variety as you want.  There can also be quite a large number of heritage and heirloom varieties available

It was held at the Hulme Community Garden Centre in Manchester which was in itself a lovely place to be - lots of plants for sale, plenty of willow and hazel poles (some of which I may be going back for).

Hulme Community Garden Centre

I wanted to get a few more varieties to try out on the plot.

I already have maincrop (Anya), first early (Pentland Javelin) and second early (Maris Piper) so I wanted at least one more of each type.

My wife had requested that I try to grow some blue potatoes, so the first pack I looked at was Salad Blue, a heritage maincrop.  These were on sale for £0.25 per tuber, or 1kg for £2.20.  I bought a kilo containing 22 tubers.

Next I got a kilo of Cassablanca first early and also a kilo of Bambino second early for £1.50 each.  These are both new-type potatoes so there were about thirty tubers of each.

All I need now is about six more egg trays and enough space in the conservatory to get them all chitting in time to be planted out at the start of the potato growing season in March

Moving on at last

At long last it looks like the drainage problems on the top half of my plot might be starting to clear.

The drainage channel has been dug slightly deeper to allow any surplus water to drain away, and the land on either side is noticeably better.

There is still standing water up near the top path, and I have still got to dig a couple of side trenches to try and clear this but for now the improvement there is has allowed me to start to create the paths that will border my fruit and herb area.

Bark on top of Weed fabric
A few flags on top


The path was made of several inches of bark chippings on top of weed suppressing fabric.  In some places the bark had to be almost six inches thick as the ground underneath was still so soggy that I was still sinking into the mud even through the bark to start with.

Flags were then laid on top of the bark and stamped down to level.

Before
I brought several bags of stone from home to fill the drainage trench, but it was only enough to fill just about half of it's length, so I decided to start at the edge of the plot and move inwards which would allow me to start to make the path on that side also.

I filled the trench to within an inch or two of the surface and then used part of the spoil heap left by the digger to completely fill it in.

This spoil heap needed moving anyway as it was in the way - I need to move the rhubarb bed back towards the path about four feet.


The trench part filled


I didn't have enough spare flags to complete the pathway, but I discovered another problem whilst I was working there

The rhubarb bed had been created in line with the pond which in turn had been made in line with the paths that border the plot, but when I made some rough measurements it seems that the end of the bed closest to me in the picture is about five inches closer to the existing beds to the left of the picture than the far end.

I did the measuring late in the day when I was very tired, so it is entirely possible that I have got it wrong.  I was sure that we did all the measurements when we first set the bed up.

I will have to re-measure next weekend when I am fresh and slightly more awake than I was on Sunday.


Rhubarb crown #1


If it turns out that the beds are misaligned it won't be a major problem as one of the beds I was planning to run between the two paths is for the fruit bushes, so once they have grown a bit the edges of the beds will be hidden a bit so it shouldn't be too noticeable.


Rhubarb crown #2


I have enlisted the help of son Will next weekend to get the rhubarb bed moved to it's correct position. 

Once that has been done I am hoping that I will be able to transplant the rhubarb both from home and also from bed 2. 

I might even be able to bring in Stepdad Ken's rhubarb from his house too.


The top half of my plot as it was on Sunday when I finished.


More new plants for the plot

I think I will have to stop going for the food shopping - the local supermarkets are having so many seasonal special offers in every week that are just so hard to resist!

For example, this week I picked up another 24 strawberry plants (8 early, 8 late and 8 all year) and a pack of shallots from Aldi all at £1.99 per pack.

I also picked up a 3kg box of Blood, Fish & Bone powder for £3.99, and it was touch and go as to whether I purchased a cold frame, but I manfully resisted the temptation - for this week at least.

I was actually looking for a few packs of Asparagus, but they had already sold out despite them only having been on sale that day.

I had previously decided that I wasn't going to grow asparagus as it would tie up a bed completely, but this was a deal almost too good to miss. 

Unfortunately I missed it.

This will add another £12 to my costs for the year.  I have also decided to include the costs of any seeds that I purchased last year to be used this year.

The drainage channel has had a bit of a test over the past few days as we have had snow, rain, hail and everything in between.  A couple of sections need to be deepened by a couple of inches, and I also need to carry on deepening the channel through the orchard to allow the water to drain more easily but overall it appears to be working as planned.

I have some 3/4" stone at home which I am going to use to fill the drainage channel but I hadn't brought it with me today so I couldn't start to lay the path over the channel as planned.

Whilst looking at the rhubarb bed which is currently the only piece of infrastructure in place on the top half of my plot (apart from the pond) I have realised that it is in the wrong place and needs to be moved about 3 or 4 feet back to line up with the edge of my plot.  This is a bit of a nuisance as the ground under the bed has already been dug over and enriched with loads of manure, but there is no helping it.  Also, part of the spoil heap left by the digger is in the way so I will have to move that first.

As I couldn't start on the path over the drain I decided to start on the path next to my existing beds instead.  I laid some black membrane down and covered it with a few inches of bark chippings, then moved some of the flagstones from the existing paths to the new path, mainly to give me an idea of the amount of space that I will have to build the new beds and also plant the fruit bushes between the two new paths.

Another cost that I hadn't counted on will be the cost of some scaffolding boards to make the soft fruit and herb beds.  I am not going to use the planks I already have because the new beds will only be 24" wide, and as the original wood I have is 3" wide that will be far too much of the bed taken up by the wood edgings.

We have quite a large number of scaffolding boards on the plot at the moment - cost to plotholders is only 20p per foot, so as I will need approximately 48 foot to start with, that works out at roughly £10 for a bed 19' by 2'. 

Not bad at all.

First Signs of Life

After planting up my first leeks and beans just over a week ago I thought I would share their progress.

Broad and Runner Beans - 10 days after sowing
No signs at all from the Runner Bean Sonesta (on the left), but three strong plants from Runner Bean Enorma and eight out of twelve of the Broad Bean Aquadulce are coming through.

These have been kept on my kitchen table which is out of direct sunlight and watered from the bottom.


One thing I have noticed is a couple of very spindly shoots also sprouting alongside the beans, obviously sonething that is coming from the potting compost.

As fast as they come up I have been removing them, but I am a bit disappointed that the compost isn't as sterile as it should be.

I also planted up 48 leeks at the same time as the beans, but so far only one shoot is showing.

A little bit disappointing, but the shoot that is showing looks to be quite a strong one.

If they all come up  like that then they should be soon ready for planting out at the plot.


15 Seconds of Fame?

It was a bit of a different start to the day on the allotment yesterday.

I found myself crouching down over my cabbages with our Association Secretary, Diane, and having to hold that position for several minutes whilst a very industrious photographer snapped away at us from all angles.

For a while now, Diane and I have been talking about starting a 'Grow it Yourself' group that would provide advice and a place to go to for help with any aspect of gardening, whether it be allotment related or even what to grow on a small balcony of a high rise flat.

We had long felt that with the recent upsurge in interest in growing your own food many people had gone out and bought seeds and seedlings from the local Garden Centres, planted them out but then didn't know what to do with them, so their crops failed.  We wanted people to be successful and to be able to complete the whole cycle from seed to plate.

We have managed to get a room at a local school and even persuaded local plot holder to do a short talk for us.  All allotments in the area had been contacted and asked to support us by attending, but what we really needed was to get the general public involved.

Click here to see the Advertising Poster for GYO Group

I had a contact at the local free paper, so we sent her a press release and she was straight in touch the following morning, very enthusiastic, and wanting to send over a photographer to get pictures to make the story stand out in the paper.

So there we were, grinning inanely for the camera as we pointed at cabbages, leaned on forks and shovels and generally tried to look both industrious and intellectual at the same time.  I hope it works and there is plenty of interest and attendance at the first meeting.

Solution to the Drainage Problem?

At long last I am hopeful that the water logging problems I have been having with the top half of my plot may be on the way to being sorted.


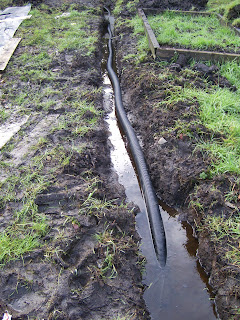
The start of the pipe

A couple of weeks back we had managed to get a mini digger to the plot which had deepened and lengthened the drainage channel which I had already dug.  The new channel went down about 10 inches from the surface which was great, but I discovered that the centre of my plot was about 8 inches lower then the edge, which meant that I still had a load of water trapped in the middle as the channel sloped upwards towards the path.
 
Drainage trench from my plot to the Orchard

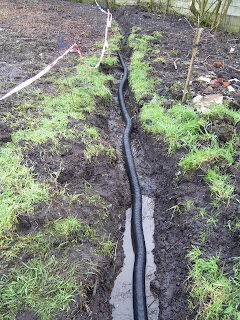
Drainage trench through the Orchard


Yesterday afternoon I decided that I would have to manually dig this channel out to make sure that it sloped away from the centre, and after about an hour of hard work I managed to release all of the trapped water.

I didn't get rid of all of the water as you can see from the picture, but that isn't necessarily a bad thing as I a couple of inches of moisture deep down can be very useful, especially if we actually get a nice hot summer this year.

We already had several lengths of drainage pipe on site that had been donated last year, so I wrestled one of those into place.  During this wrestling I discovered that the pipe didn't like being stretched into place, it had to be unrolled along the trench instead.  Unfortunately I only discovered this when the end of the pipe had flicked loads of very muddy water all over me as it was being laid.

I now need to cover the pipe on my plot with lots of 3/4" stone and hardcore rubble to allow any water to easily filter down to the pipe, and then I can lay flagstones over the whole thing, both to protect it and also prevent me from inadvertently trying to plant anything over it in the future.

I may also need to dig side channels to encourage any excess water away from where I am planing to have my shed, polytunnel and a sitting area, but for now I think I will wait until we have had some more rain and see how well it drains by itself before digging any more.

After all the digging I didn't really have much time for anything else, but I did manage to get Bed 3 weeded.

This is the bed where I planted out all the brassicas that had been eaten by almost every pest you can get on a plot, so they had a very poor start and are still only about 3-4" tall.

Despite this most have survived the worst the winter has had to throw at them so far, but quite a few weeds had also take the opportunity to invade the bed and needed to be controlled before they became a problem.

This was the first time I had touched the soil here since planting the seedlings out back in October, so I was very pleasantly surprised to discover that the soil structure was really fine, very few lumps and so the larger weeds pulled out easily with very little effort, and the smaller ones were dug in with a dutch hoe.

This bed was one that had been double dug and had originally been all huge blocks of soil on the surface - I guess that I can thank the freezing weather we have had recently for breaking it all down into a lovely tillth.

I had read in all my books that this would happen, but never realised just how much of a dramatic change there could actually be until I saw it for myself.

I also started to weed the Rhubarb bed, which was full of what looked to be very well established grass, but when I got going I realised that the top six inches of the bed was pure manure and therefore very loose.

This made it easy to chop up the grass with a hoe and push it under the surface, not something I would normally do but this grass didn't appear to be couch grass, and I am going to put another layer of soil and then a final layer of manure over it before transplanting the rhubarb crowns so I am hoping that it will simply rot down and not come bursting out again later.

If it does, I will deal with it then.

First Seed Swap

Last Monday I went to my first ever Seed Swap at the Peveril of the Peak pub in central Manchester.

It had been arranged by the 'Big Dig' organisation, and I had arranged to meet Diane from my allotment there.

The weather on the night itself was really windy with gusts of up to 60mph and driving rain, so not pleasant at all.  I wasn't hopeful of a big turnout with the consequence of fewer seeds to swap.

On Sunday night I had spent an absolute age sorting through my spare seeds and re-packaging them into smaller quantities that would be of use to a gardener rather than having to deal with 1000 or so seeds in a standard packet.

I got to the venue slighly before the published start date to find that there were only two other people there, one of which was Diane.  It seemed that the weather had either delayed or put other people off, but fortunately several other hardy souls started arriving soon after.

The way the seed swap worked was that there were several tables set out for the seeds, split between brassicas, legumes, greenhouse stuff (like peppers, tomatoes, etc), salad crops, herbs, flowers and others.

On arrival you simply dropped the packets you had brought with you on the appropriate table, and were free to rummage through the seeds brought by everyone else.  There was no limit to how many packets you could take.

I took several packs of French Breakfast radish, butternut squash, parsnip, carrot, some salad leaves and a few peas.

I came away with Sonesta French Beans, , Purple Queen French Beans, Broad Beans, Mr Fearns and Mr Fortune Beans, Romanseco Broccoli, Tomatoes - Green Zebra and Green Sausage, Baby Bear Pumpkin, Paris Silver Skin Onions, Courgettes Striata Di Italina, Black Beauty and Green Bush, Chilli Hot Patio Sizzle and some Lavender.


So, I think that I would go to another seed swap if one was available locally, and I have also decided that I will not be splitting packs of seeds up to distribute to plot holders on our allotment - it took far too long to split the relatively small number I did for the seed swap.

Instead, once we have a communal building, I will put the spare seeds in there that anyone can take whatever they need and put back any they haven't used.

Sowing the first seeds of 2013

Well, last night I finally took the plunge and sowed my first seeds of 2013.

I had been putting this moment off for some time now for a few reasons.

Firstly, at the moment there is very little room free to put seeds at home as my son and his girlfriend are staying with us until they can find a new house, so we have a lot of their furniture squeezed into every available spare space.

Secondly, although several of my reference books suggest New Year's Day as the prime time for planting leeks, I had concerns that the level of natural light that would be available to any seedlings wouldn't be enough to prevent them going weak and leggy.

As these leeks are being grown as part of a fun online competition I want to make sure to give them the best possible start, so I decided to delay sowing until now in the hope that a later date would give stronger seedlings.


I planted 48 Leek 'Mammoth' into two trays of individual modules.  Once again I strayed from traditional methods which recommends sowing thinly into a tray and only thinning into modules once the seeds are a few inches tall.

I decided to plant direct into modules, one seed per module to give the leeks the best possible chance to develop without any competition for water and nutrients and also no disruption to the root system until I am able to plant them out in their final positions.  The main disadvantage with my chosen method is that if any seeds fail to germinate then I have wasted the space, but there will be nothing to prevent me from sowing another seed in the empty module, so I am hopeful that I have made a good decision here.

I also decided to plant up a few beans, again to try and give them a good start.

I sowed 8 Broad Bean Aquadulce Claudia, 8 Runner Bean Enorma and 4 Runner Bean Sonesta.  All the beans were sowed into individual 2 1/4 inch pots.

I watered them from the bottom by standing them in the sink filled with a couple of inches of water for a few minutes.  Looking at them tonight I noticed that a couple of the Broad Beans had risen to the surface of the compost.  Now it is too soon for them to be germinating and so I pushed them back under the surface.

I would have sowed more but I was limited to space to store them on the kitchen table.

As soon as the weather improves enough I will transfer these trays into the blow away and sow a second batch of leaks plus a few more varieties of beans and peas.

Planting Calendar

As a relatively new gardener, one of the most difficult things for me has been knowing when I can plant my seeds, and whether they need to be started off inside, or if they can go straight out into the ground outside.

All the information I need is contained in the many gardening books that I have bought or been given over the past few years, but digging them all out to cross reference and look up every seed before I can get round to actually sowing anything has always led to me delaying my sowing way past the optimum planting times.

I decided that rather than end up planting things too late again like I did last year I would do the hard work and collate all the information into the same place, so I spent most of last weekend creating a Planting Calendar in Excel.

[URL="https://docs.google.com/file/d/0Bzlq-b8-KZuiTXRLbGFEcHd1MlE/edit?usp=sharing"]https://docs.google.com/file/d/0Bzlq-b8-KZuiTXRLbGFEcHd1MlE/edit?usp=sharing[/URL]

The calendar shows which seeds can be sown each month.  You need to scroll down to the third page (the ones in colour) to see the calendar.

It shows which seeds need planting indoors, outdoors, outdoors but undercover and even when to plant out the seedlings originally sown indoors.

Please have a look at the file on the link above and let me know what you think of it.

First Week Back on the Plot

Last weekend I went to my local pound shop and picked up a few choice goodies for the allotment.

I got four bags of seed potatoes, 2 x Pentland Javelin (first earlies) and 2 x (second earlies), each with 8 tubers of each.

I also got two nets of onion sets, one Sturon and one Stuttgarter, both of which look to have about thirty bulbs in.

There were several packets of seeds including sweetcorn, chillis, mizuna, coriander, several peas and beans, little gem lettuce, cherry tomatoes and a pack of sunflowers.  I was also fortunate to pick up several fruit bushes from Aldi at £2.50 for three.

I managed to get a couple of different packs of grow at home mushrooms so I can compare how they both perform.

This year I have decided to keep detailed records on how well I do, financially, with my allotment.  The cost of anything I spend to use on the allotment is offset against the equivalent price I would have had to spend to purchase any produce that I can harvest.

At this point in time I have spent £34 in total, but I have harvested a few bits of the overwintering veg (including the cabbage pictured to the right) which would have cost me £4.75 if I had bought it, so my net cost is is £29.25.

This isn't a problem as I fully expect the majority of my costs to be incurred in the first part of the year, but when the main harvesting begins at the start of summer I hope that I get into a surplus quite quickly.


 The fruit bushes from Aldi were 3 x Red Goosebery Hinnomaki, 5 x Raspberry Tulameen (this should have been only 3, but there were five separate canes in the pack), 3 x Blackberry Thornlass Evergreen and 3 x Redcurrant Jonkheer Van Tets.

As the area designated for fruit bushes is still very waterlogged I have planted them into a temporary home in one of the raised beds along with the blackcurrant 'twigs' that Diane gave to me before Christmas.


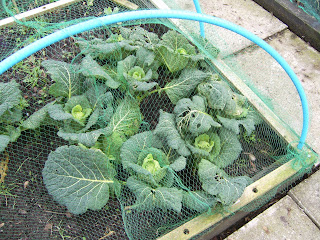
When we had the heavy snow a couple of weeks back the netting over my brassicas in bed 1 was pretty much destroyed, so I needed to remake the entire frame and re-hang the netting. 


This time I covered the entire bed rather than just the bottom half as unfortunately the pigeons had got in and rather shredded the remaining two savoy cabbages.


These had been doing rather well when compared to the savoys in the other raised bed, so I am quite diasppointed as I had a bed with stepdad Ken about whose cabbages would grow the biggest - mine in a 'lasagne' bed, his in a traditional double dug bed.

Up until now mine were doing best - I just hope that now they are covered they will be able to recover as the weather starts to get better.


The Jumbo Garlic bought at the supermarket is really looking good, with shoots a good five inches tall, but the garlic purchased from a supplier has yet to show at all.

Not really sure why, but it's all a learning curve still.


The leeks which I brought from home very late last year have survived the snow and are doing well, and are now about 8 inches tall.


The bed full of onion sets is starting to look pretty good, with virtually all of them now showing strongly.

The two bags of onion sets I have just bought will be going into the ground later, after the chance of frost has passed.


I am going to my first ever seed swap tomorrow at the Peveril of the Peak pub in Manchester, so I am hoping to return loaded down with plenty of new and unusual seeds.


In the Bleak Midwinter ......

Well.looking back on my recent posts I am a bit ashamed to note that I have only posted twice in the past two months despite my best intentions of updating at least weekly.


In my defence, however, I must say that the weather had been horrible and so even when I have been able to get to the plot, there has been very little to do apart from tidy up and repair any damage to the frames caused by the frost and snow.


On the rare occasions when I did manage to get on the plot I was often greeted by the very beautiful, if frustrating sight of my over-wintering vegetables coverd in a thick layer of frost.


Some were affected more by the frost than others - the perpetual Spinach and rainbow Chard both were hit hard, presumably because of the high water content in their stalks. 


Others, like the cabbage survived without any problems.


I was a little concerned about the smaller brassica seedlings that went into the beds very late last year, and had been attacked by pigeons, slugs and caterpillars but they too have come through the worst the winter has thrown at us so far.
I thought the frost 'halo' on this tiny Brussel Sprout especially nice.


The drainage channel I had started to dig before the weather made it impossible to carry on got completely full from the heavy rain and had then frozen solid - the picture shows eight inches of solid ice!